In this article, I will try to show you how to integrate Angular Universal to ASP.NET Boilerplate’s ASP.NET Core & Angular template (https://github.com/aspnetboilerplate/module-zero-core-template). Then, we will build a basic application called Hero Shop. This application will display list of heroes and give you a starting point for your ASP.NET Core and Angular Universal application.
First Words
I think Single Page Application Frameworks are really good for developing backend applications nowadays. SPAs provide better developer and user experience.
We are also using Angular in both ABP Framework’s free templates and AspNet Zero.
SPA frameworks are not considered as a good solution for public websites because of some well known reasons like long initial app load time and SEO optimizations. Angular provides universal rendering in order to overcome these technical hassles. A more detailed information can be found here https://universal.angular.io/.
Create the Project
Let’s start by downloading a new template on https://aspnetboilerplate.com/Templates. Name your project as Acme.HeroShop.
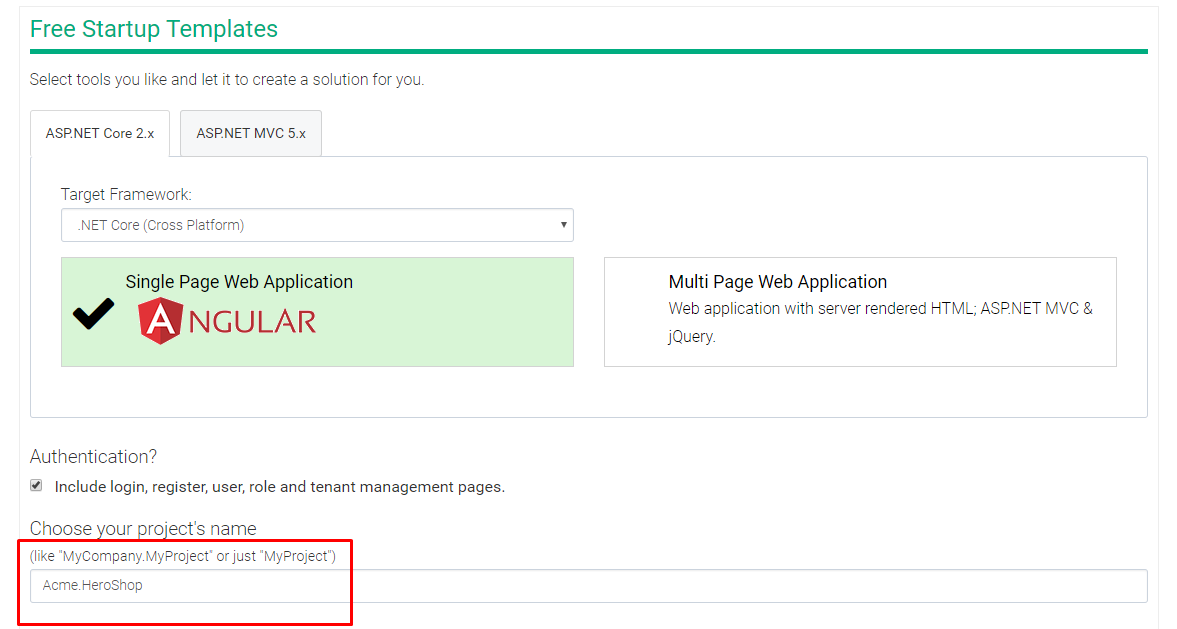
When you press “Create my project” button, you will get a zip file including the Visual Studio solution.
You can run your application according to this document https://aspnetboilerplate.com/Pages/Documents/Zero/Startup-Template-Angular.
Add the Public Project
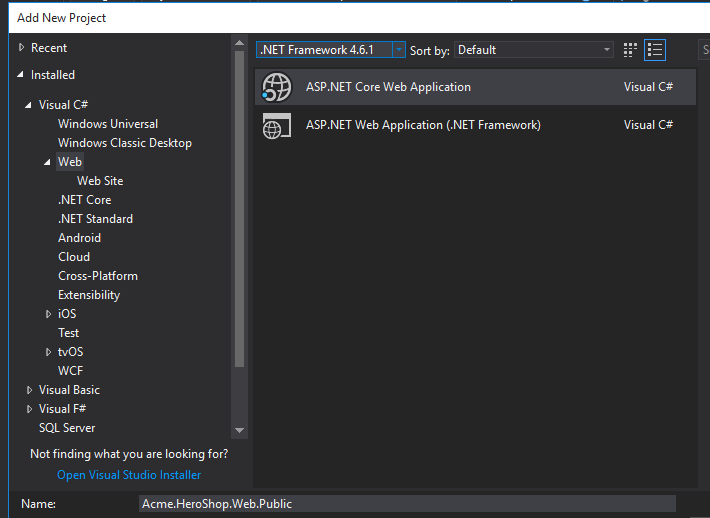
Add a new project called “Acme.HeroShop.Web.Public” to your “Acme.HeroShop.sln” solution. Select Empty project in the next step. We will configure everyting from scratch 😉.
Create angular-cli app
It’s time to create your angular app. Run “ng new HeroApp” command in the root folder of your “Acme.HeroShop.Web.Public” project.
You need angular-cli to be installed globally in order to run this command. You can install it if you haven’t done it before. Installation of angular-cli is explained on it’s own github page https://github.com/angular/angular-cli#installation. For this article, we used angular-cli v1.6.5 .
Latest version of Angular is v5.x at the moment but some of the npm packages we are using don’t support v5.x for universal rendering, so you need to downgrade Angular npm packages to v4.x. Just open package.json and change “@angular/**” package versions to “4.4.6”.*
Then, move .angular-cli.json and package.json to root folder of Acme.HeroShop.Web.Public project. This will allow you to run your commands in the root directory of Acme.HeroShop.Web.Public project.
Change the value of root property in .angular-cli.json to “HeroApp/src”.
Delete node_modules folder in HeroApp and then run “npm install” and “ng serve” in the root folder to see if initial angular-cli app is working. To see if it is working, you can browse http://localhost:4200/. You will get the below screen if you succeed.

We prefer using Yarn to install npm dependencies. Yarn is less error prone. If you want to use Yarn, just install it by following the instructions on https://yarnpkg.com/.
Configure Angular app for universal rendering
In angular-cli.json, there is an app definition in the apps:[] array. You will create another app for your sample. The original app definition is created for default usage which is not universal rendering. Here is the new app definition.
Now, you can add the following packages for universal rendering:
@nguniversal/aspnetcore-engine
@angular/platform-server
aspnet-prerendering
Run below commands to install these npm packages and save them into package.json file.
npm install @nguniversal/aspnetcore-engine --save
npm install aspnet-prerendering --save
npm install @angular/platform-server --save
Copy “modules” folder from this link (https://github.com/aspnetboilerplate/aspnetboilerplate-samples/tree/master/AngularUniversal/aspnet-core/src/Acme.HeroShop.Web.Public/HeroApp/src/modules) to “HeroApp\src\” folder of your angular-cli app. These files are used in your app.server.module.ts (we will create it later) to transfer data from server to client.
Open your app.module.ts and change it’s content like below:
Then, you need to create a server module. Create a file called “app.server.module.ts” under “HeroApp\src\app” and set it’s content to:
Create a file called “tsconfig.server.json” under “HeroApp\src” and change it’s content to:
As you can see, AppServerModule is used as the entry module instead of AppModule for server side rendering.
Let’s create main.server.ts instead of using main.ts for server side rendering. main.server.ts must be in the same folder with main.ts which is under “HeroApp\src”. Here is your new main.server.ts file:
Create polyfills.server.ts and polyfills.client.ts under the “HeroApp\src”.
polyfills.server.ts:
import './polyfills';
import 'zone.js';
polyfills.client.ts:
import 'zone.js/dist/zone';
Since zone.js is imported manually in main.server.ts, you need to comment out zone.js importing in polyfills.ts, otherwise you will get a runtime error.
Now, your angular-cli app is ready for server side rendering. You can start to work on ASP.NET Core application.
Preparing ASP.NET Core app
Start by disabling typescript building in your Public project by adding <TypeScriptCompileBlocked>true</TypeScriptCompileBlocked> between <PropertyGroup>...</PropertyGroup> tags because you are not trying to build typescript using Visual Studio. Now your project must be building in Visual Studio.
Add an ABP nuget package reference to your public website. You can add <PackageReference Include="Abp" Version="3.3.0" /> to Acme.HeroShop.Web.Public.csproj and let Visual Studio restore nuget packages. Also add a project reference to Acme.HeroShop.Web.Core. It provides base controller and some other features.
Then, you need to create an ABP module called “HeroShopPublicModule”.
You also need to modify Startup.cs and add a HomeController to run your public website.
Here is the Startup.cs file:
AddNodeServices middleware allows to process angular-cli app on the server side.
Create a new folder called “Controllers” and add an empty HomeController inside the Controllers folder.
public class HomeController : Controller
{
    public IActionResult Index()
    {
        return View();
    }
}
Add the view called Index.cshtml for HomeController’s Index action with the below content:
@{
ViewData[“Title”] = “Index”;
}
<h2>Index</h2>
Your ASP.NET Core app must be up and ready at this stage.
In order to transfer your server side rendered app to client, you need two basic model classes. Create a folder called “Models” at the same level with “Controllers” folder and place the below classes inside of Models folder.
SimplifiedRequest.cs:
public class SimplifiedRequest
{
    public object cookies { get; set; }
    public object headers { get; set; }
    public object host { get; set; }
}
TransferData.cs:
public class TransferData
{
    public dynamic request { get; set; }
    public object thisCameFromDotNET { get; set; }
}
Now, you can modify HomeController to return server side rendered angular app.
Here is the updated HomeController.cs:
You need to modify Index.cshtml to display server side rendered Angular app. The rendered html is stored in ViewData[“SpaHtml”], so you can easily write it in Index.cshtml;
@Html.Raw(ViewData[“SpaHtml”])
Run the below code using command prompt in the root directory of Acme.HeroShop.Web.Public project to publish your second app. “app 1” refers to the second app in angular-cli.json.
ng build — prod — app 1 — output-hashing=false
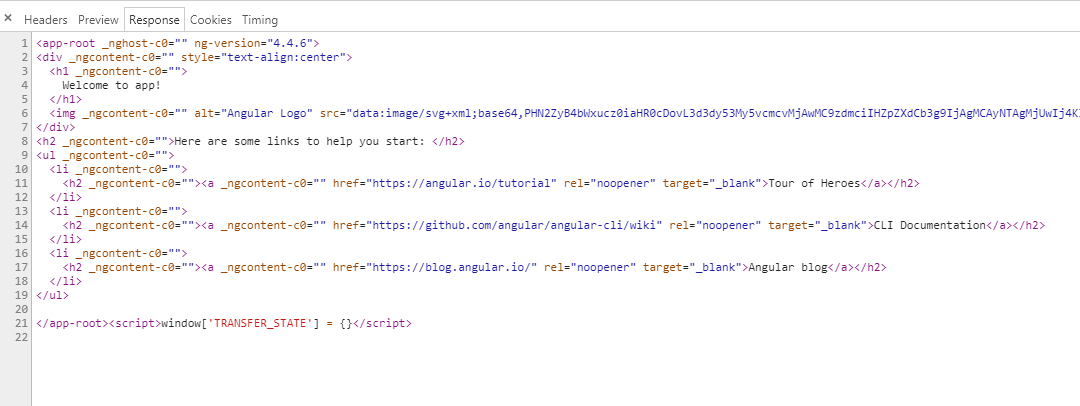
This command must publish your app to “HeroApp\dist-server” folder. Then, press F5 to run ASP.NET Core app. It should display server side rendered app. There is nothing new on the UI because we haven’t done anything for the UI. The content of the page is served by ASP.NET Core. Here is the response of Index action:
Creating Hero Entities
You have managed to setup your server side rendered angular app. Now, you can start creating the entities. You will have two simple entities; Hero and HeroCompany. Add a folder called “Heroes” to Acme.HeroShop.Core project and add below classes into this folder.
HeroCompany.cs:
public class HeroCompany : Entity
{
    public string Name { get; set; }
}
Hero.cs:
public class Hero : Entity
{
    public string Name { get; set; }
    public int HeroCompanyId { get; set; }
}
Add your new entities to the HeroShopDbContext:
public virtual DbSet<Hero> Heroes { get; set; }
public virtual DbSet<HeroCompany> HeroCompanies { get; set; }
After that, add a migration using Visual Studio’s Package Manager Console by running the command
Add-Migration "Added_Hero_Entities"
Then, run the below command to update your database.
Update-Database
Let’s create initial hero data in SeedHelper.cs. Create a new class called “InitialHeroBuilder.cs” and use it like below in SeedHostDb method of SeedHelper.cs.
new InitialHeroBuilder(context).Create();
Here is InitialHeroBuilder.cs:
Creating HeroAppService
You will need an API to get list of heroes and hero companies from HomeController. Let’s create app services and related DTOs.
Here is the HeroDto:
[AutoMapFrom(typeof(Hero))]
public class HeroDto : EntityDto
{
    public string Name { get; set; }
    public int HeroCompanyId { get; set; }
}
and here is the HeroCompanyDto:
[AutoMapFrom(typeof(HeroCompany))]
public class HeroCompanyDto : EntityDto
{
    public string Name { get; set; }
}
This is IHeroAppService interface:
public interface IHeroAppService : IApplicationService
{
    List<HeroDto> GetHeroes(int? heroCompanyId);
    List<HeroCompanyDto> GetHeroCompanies();
}
To retrieve heroes, create a new method called GetHeroes and to retrieve hero companies create GetHeroCompanies method.
The implementation of HeroAppService will be simple, thanks to ABP Framework and it’s generic repository implementation 😄.
Building the UI
Before displaying heroes on the client, let’s add bootstrap and jquery to Angular app.
To install bootstrap, run below command in the root directory of Acme.HeroShop.Web.Public project.
npm install bootstrap --save
Then, add Bootstrap’s and Jquery’s css/javascript files into styles and scripts arrays of the second app in angular-cli.json. It should be like this:
"styles": [
    "./assets/bootstrap.min.css",
    "styles.css"
],
"scripts": [
    "../../node_modules/jquery/dist/jquery.min.js",
    "../../node_modules/bootstrap/dist/js/bootstrap.min.js"
]
I had a problem with bundling bootstrap.min.css from node_modules folder while writing this article. There was something wrong with Bootstrap css and angular-cli working together. Bootstrap v4 has just been released a few days ago at the moment I was writing this article. Because of this problem, I have downloaded bootstrap.min.css and placed it under assets folder of HeroApp.
Bundled css and javascript files will be served from “HeroApp/dist-server” folder. In order to do that, add below code to Configure method of Startup.cs.
app.UseStaticFiles(new StaticFileOptions
{
    FileProvider = new PhysicalFileProvider(Path.Combine(Directory.GetCurrentDirectory(), @"HeroApp", @"dist-server")),
    RequestPath = new PathString("/HeroApp/dist-server")
});
Now, you can add scripts.bundle.js and styles.bundle.css to Index.cshtml:
<script src="~/HeroApp/dist-server/scripts.bundle.js" asp-append-version="true"></script>
<link rel="stylesheet" href="~/HeroApp/dist-server/styles.bundle.css" asp-append-version="true" />
Listing Heroes on the UI
Let’s modify app.component.ts and app.component.html to display the list of heroes.
First, create a few heroes in app.component.ts before binding Angular app with the server side data.
As you can see in the above code, two arrays are being created and populated with dummy data in ngOnInit.
Then, show this dummy data in app.component.html:
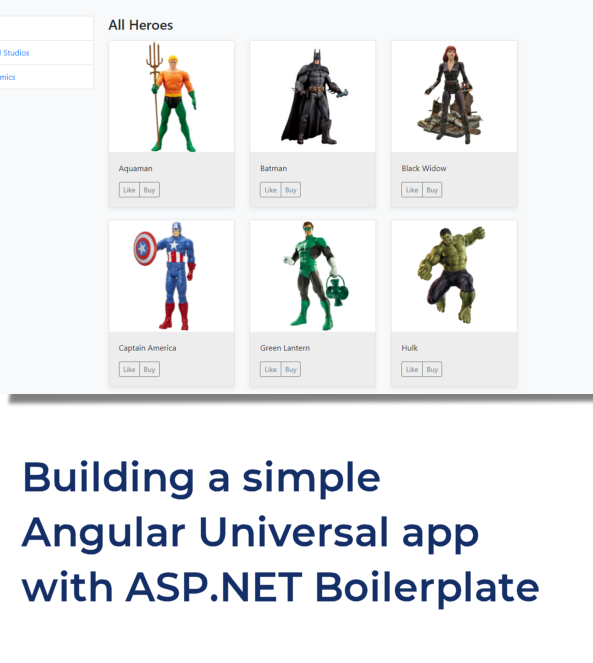
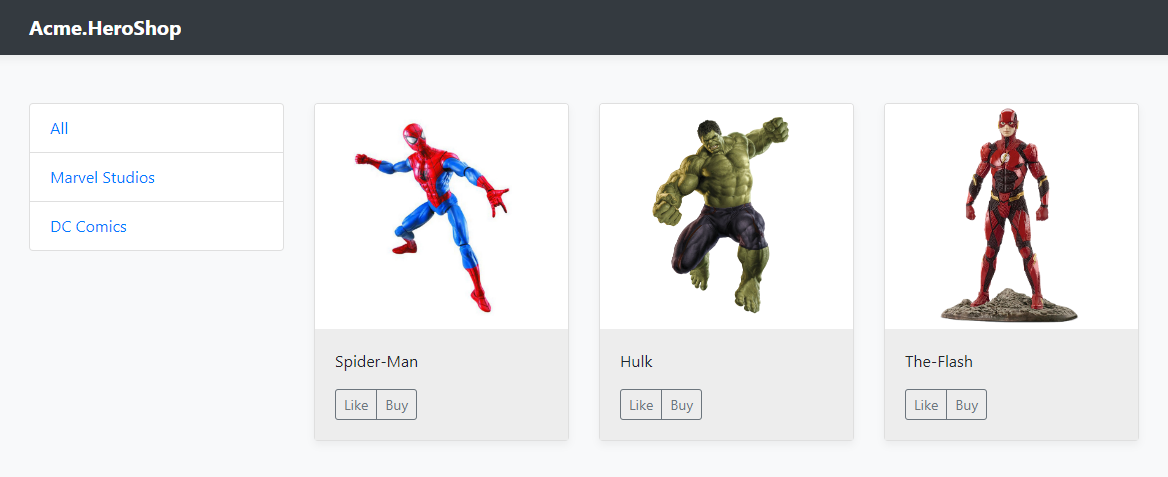
On the page, left side contains hero companies and right side contains hero cards. Add your hero images to “assets/images/heroes” folder with “{hero.name}.png” syntax. We have already done it.
Now, you can build Angular app using below command:
ng build --prod --app 1 --output-hashing=false
Then, hit F5 to run ASP.NET Core app to see what the UI looks like:
Listing Server-Side Data
As the last step, you will show server-side data in the Angular app. In order to do that, you need to inject IHeroAppService into HomeController. In order to register HomeController for dependency injection, you need to derive it from HeroShopControllerBase. Hence, you can easily inject IHeroAppService.
public class HomeController : HeroShopControllerBase
{
    private readonly IHostingEnvironment _hostingEnvironment;
    private readonly IHeroAppService _heroAppService;    public HomeController(
        IHostingEnvironment hostingEnvironment,
        IHeroAppService heroAppService
    )
    {
        _hostingEnvironment = hostingEnvironment;
        _heroAppService = heroAppService;
    }


    //Other codes...
}
To configure ABP dependency injection system, you need make some changes in Startup.cs.
Change the return type of ConfigureServices method to be able to return IServiceProvider and add the below code to the last line of ConfigureServices method.
return services.AddAbp<HeroShopPublicModule>();
Then, add below code to the first line of Configure method.
app.UseAbp(options => {options.USeAbpRequestLocalization = false;});
Here is the final look of Startup.cs:
For database connection, you need to add the below appsettings.json file to Acme.HeroShop.Web.Public project. Even you don’t need authentication, it is necessary to add JwtBearer configuration for ABP Framework.
From now on, HomeController is ready to return data from server-side to Angular app.
You can set “thisCameFromDotNET” property of transferData object like below in HomeController:
TransferData transferData = new TransferData
{
    request = AbstractHttpContextRequestInfo(Request),
    thisCameFromDotNET = new
    {
        heroCompanies = _heroAppService.GetHeroCompanies(),
        heroes = _heroAppService.GetHeroes(null)
    }
};
You can access the data in ngOnInit of app.component.ts like below:
ngOnInit(): void {
    this.heroCompanies = (window as any).TRANSFER_CACHE.fromDotnet.heroCompanies;
    this.heroes = (window as any).TRANSFER_CACHE.fromDotnet.heroes;
}
Here is the final app.component.ts:
And here is the final app.component.html:
Finally, create a Shared folder under Views folder of Acme.HeroShop.Web.Public project and create _Layout.cshtml file with the below content:
Set, this as the layout of your Index.cshtml. Create a _ViewStart.cshtml file with the below content under the Views folder of Acme.HeroShop.Web.Public project.
@{
    Layout = “_Layout”;
}
To make this app work as a SPA, add the below bundle scripts to Index.cshtml. (This is needed because Angular Universal doesn’t take responsibility of SPA features.)
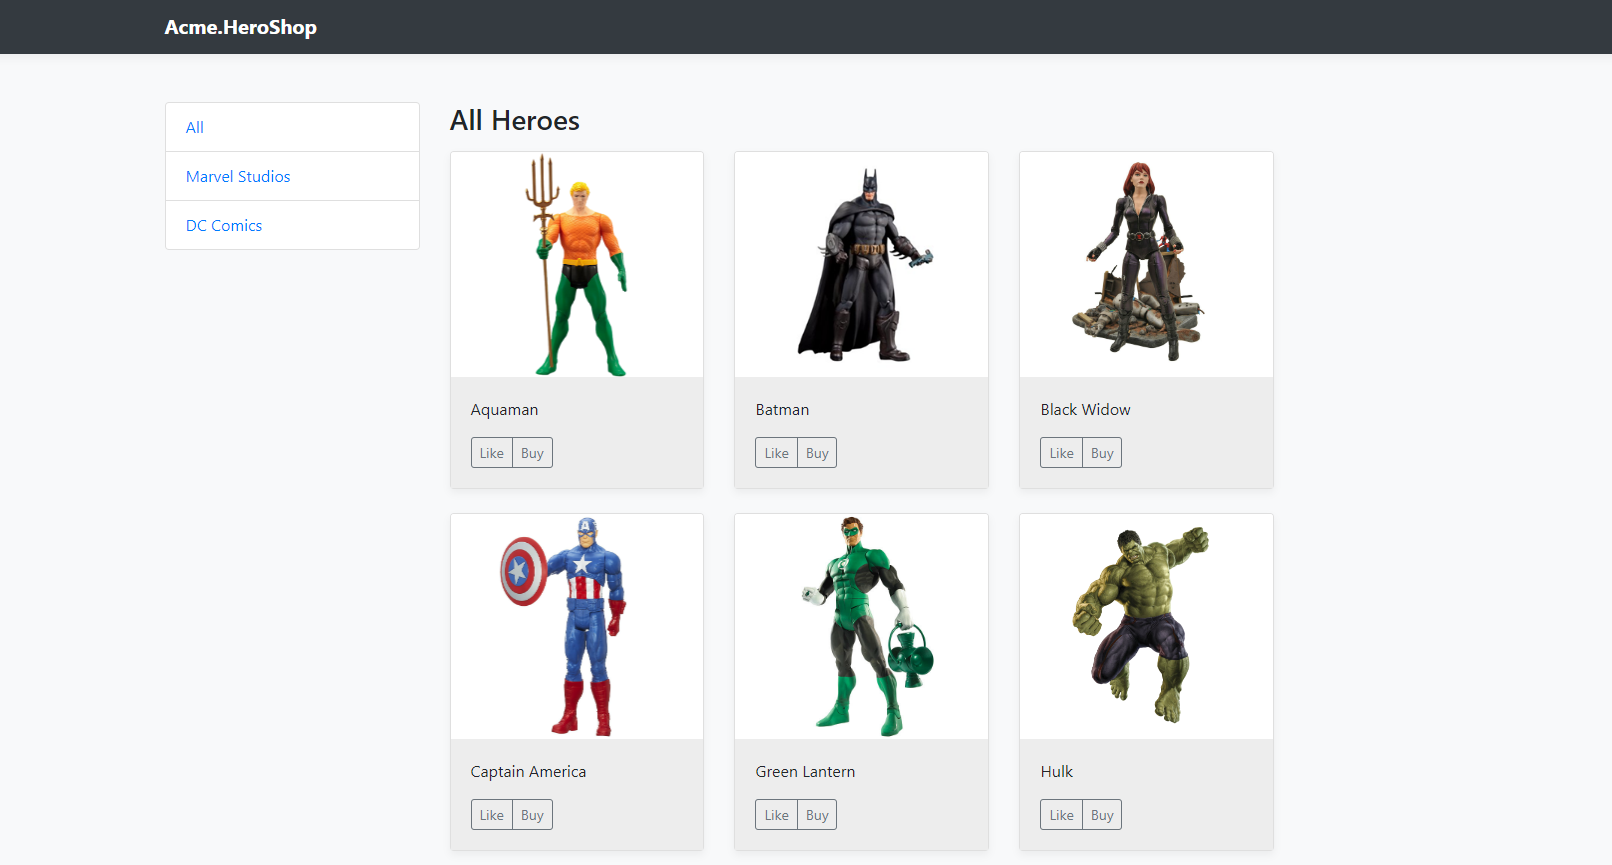
Finally, here is what it looks like.
Summary
You can access the sample project on GitHub https://github.com/aspnetboilerplate/aspnetboilerplate-samples/tree/master/AngularUniversal.
In order to run this project;
- First, build the project using Visual Studio
- Run “Update-Database” command in Visual Studio’s Package Manager Console
- Press F5 to start
Angular is a great framework but it requires quite amount of time to make it work with ASP.NET Core & Angular Universal. I hope this article helps you out to handle it smoothly.