In this article, I will show how to create a web farm on docker with using redis and haproxy, step by step. In this sample, there will be a web api project as a web server apps (.net core framework) and a load balancer (haproxy). I will reproduce the web api to test load balancer. These web api projects will use the same cache server(redis) to sharing data. Finally, I will simulate this web farm on docker.

I won’t go into the details of how to install/configure docker on windows. There are documents about this in here. And there is a Getting Started document as well.

Creating Web API Project

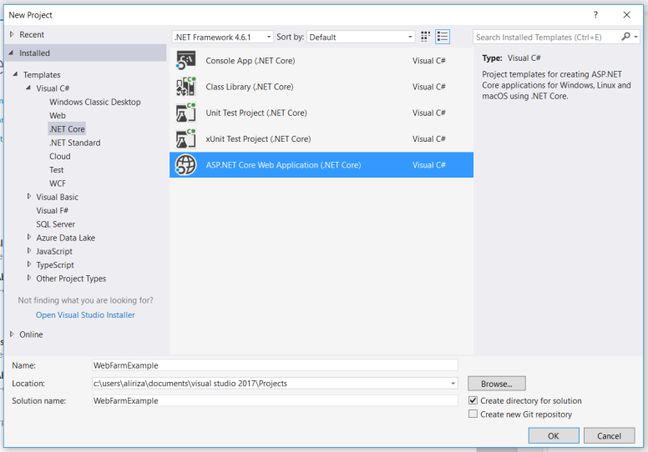
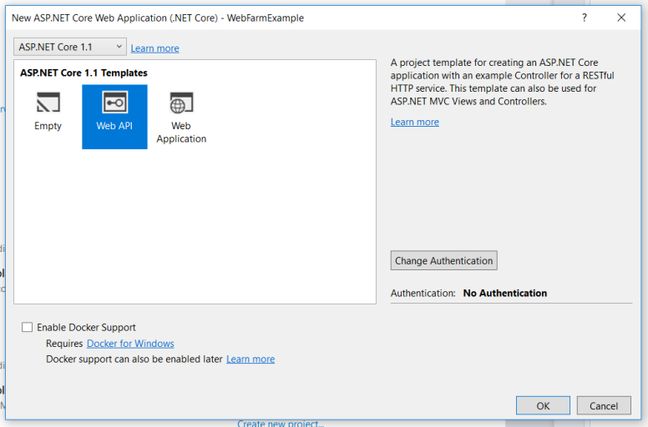
First I create basic web api project from template.

6.jpg

7.jpg

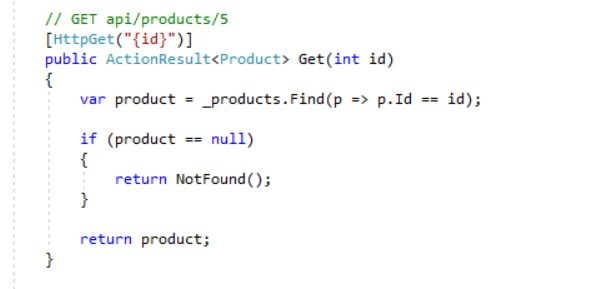
And I change the valuescontroller to set/get/remove memory cache keys.

using System;
using System.Collections.Generic;
using System.Globalization;
using System.Text;
using Microsoft.AspNetCore.Mvc;
using Microsoft.Extensions.Caching.Distributed;
 
namespace WebFarmExample.Controllers
{
    [Route("api/[controller]")]
    public class ValuesController : Controller
    {
        private readonly IDistributedCache _memoryCache;
 
        public ValuesController(IDistributedCache memoryCache)
        {
            _memoryCache = memoryCache;
        }
 
        [HttpGet("SetCacheData")]
        public IActionResult SetCacheData()
        {
            try
            {
                var time = DateTime.Now.ToLocalTime().ToString(CultureInfo.InvariantCulture);
                var cacheOptions = new DistributedCacheEntryOptions
                {
                    AbsoluteExpiration = DateTime.Now.AddYears(1)
                };
                _memoryCache.Set("serverTime", Encoding.UTF8.GetBytes(time), cacheOptions);
 
                return Json(new { status = true });
            }
            catch (Exception ex)
            {
                return Json(new { ex = ex });
            }
        }
 
        [HttpGet("GetCacheData")]
        public string GetCacheData()
        {
            try
            {
                var time = Encoding.UTF8.GetString(_memoryCache.Get("serverTime"));
                ViewBag.data = time;
 
                return time;
            }
            catch (Exception ex)
            {
                return ex.GetBaseException().Message;
            }
        }
 
        [HttpGet("RemoveCacheData")]
        public bool RemoveCacheData()
        {
            _memoryCache.Remove("serverTime");
 
            return true;
        }
 
        // GET api/values
        [HttpGet]
        public IEnumerable<string> Get()
        {
            return new string[] { "value1", "value2" };
        }
 
        // GET api/values/5
        [HttpGet("{id}")]
        public string Get(int id)
        {
            return "value";
        }
 
        // POST api/values
        [HttpPost]
        public void Post([FromBody]string value)
        {
        }
 
        // PUT api/values/5
        [HttpPut("{id}")]
        public void Put(int id, [FromBody]string value)
        {
        }
 
        // DELETE api/values/5
        [HttpDelete("{id}")]
        public void Delete(int id)
        {
        }
    }
}

Configure Web API Project for Docker

To run web api project on docker, first, I am adding a Dockerfile to project root folder. And I am modifying it like following.

FROM microsoft/aspnetcore:1.1.2
 
WORKDIR /app
COPY . .
 
ENTRYPOINT ["dotnet", "WebFarmExample.dll"]

Above lines, there is a config : aspnetcore:1.1.2 this is the version of aspnetcore.mvc version in .csproj file;

<PackageReference Include="Microsoft.AspNetCore.Mvc" Version="1.1.2"/>

Also, we should change “Copy To Output Directory” property of Dockerfile to “Copy always” to copy this file to publish folder. If we don’t set this property, we should add Dockerfile to publish folder manually.

img

Now, web api project is ready to publish and run it on docker.

Prepare Powershell Scripts to Build Web API Project And Run Docker

First, I prepared a powershell script that named build-all.ps1 to publish web api project and build Dockerfile to create docker image.

# COMMON PATHS

$dockerFolder = (Get-Item -Path "./" -Verbose).FullName
$dOutputFolder = Join-Path $dockerFolder "outputs"
$slnFolder = Join-Path $dockerFolder "../"
$webapiFolder = Join-Path $slnFolder "WebFarmExample"

## CLEAR ######################################################################

Remove-Item $dOutputFolder -Force -Recurse
New-Item -Path $dOutputFolder -ItemType Directory

## RESTORE NUGET PACKAGES #####################################################

Set-Location $slnFolder
dotnet restore

## PUBLISH WEB API PROJECT ###################################################

Set-Location $webapiFolder
dotnet publish --output (Join-Path $dOutputFolder "webapi")

## CREATE DOCKER IMAGES #######################################################

# Webapi
Set-Location (Join-Path $dOutputFolder "webapi")

docker rmi ali/webapi -f
docker build -t ali/webapi .

## FINALIZE ###################################################################

Set-Location $dockerFolder

Actually, above script is the basic powershell script to create a publish folder for web api project and move this folder to WebFarmExample > docker_config > outputs.

All our docker files and powershell scripts are located in WebFarmExample > docker_config.

I created a docker-compose.yml to manage docker images.

version: '2'

services:

    ali_webapi:
        image: ali/webapi
        environment:
            - ASPNETCORE_ENVIRONMENT=Development
        ports:
            - "9901:80"

And up.ps1 for docker compose commands.

docker rm $(docker ps -aq)
docker-compose up -d ali_webapi

Publishing Web API Project on Docker

To publish web api project and run it on docker, I am opening powershell window on WebFarmExample > docker_config and runnig build script.

img

When I run this command, it creates an ouputs folder that contains wep api publish folder in following location.

img

As you can see, Dockerfile is published, too. Now, we can run up.ps1 script.

img

Now, web api project is running on docker. Let’s check if it is realy working! First, I will check if the docker container is running. When I run the command docker ps, I can see the container is running.

img

And I am checking it with browser. I set port in docker-compose.yml, before.

img

I finished web api step. At next step, I will try to add redis cache to store web api keys.

Adding Redis Cache to Web Farm

I will add redis cache to web farm project. To do this I added redis configurations to docker-compose.yml. Latest version of the file is looking like following.

version: '2'

services:

    ali_webapi:
        image: ali/webapi
        environment:
            - ASPNETCORE_ENVIRONMENT=Development
        ports:
            - "9901:80"
           
    ali_redis:  
        image: ali/redis
        ports:
            - "6379:6379"

And I am changing up.ps1 script file and adding a script to up redis cache container.

docker rm $(docker ps -aq)
docker-compose up -d ali_redis
sleep 3
docker-compose up -d ali_webapi

I added redis up script before web api script. If there are configurations to store cache data at the web api project startup time, we should run the redis first to don’t miss any cache data.

Finally, I am adding some code in web api project to use redis cache to store cache data. Before this change we need to download redis cache extensitons. Nuget packages that we should download;

Microsoft.Extensions.Caching.Redis
StackExchange.Redis.StrongName

Startup.cs

public void ConfigureServices(IServiceCollection services)
{
    // Add framework services.
    services.AddMvc();
 
    services.AddDistributedRedisCache(options =>
    {
        options.Configuration = "localhost";
        options.InstanceName = "redisInstance";
    });
}

And now, we can run project on docker with powershell scripts like in previous article. I am running powershell scripts in order (first, build-all.ps1 and second up.ps1) in location WebFarmExample > docker_config.

Here is the powershell commands that I run.

img

Now, let’s check if redis cache is actually work. To understand if redis is realy running, I will call the actions in controller that are managing the cache keys. For example, I will call action that set cache key and second I will call action to get cache key. And result:

img

We are getting above errors, because redis is using different ip and this ip is assigned by docker automatically. To see redis ip you can run docker inspect container_id command.

img

img

There are two way to fix this. First is hardcoded; we can add this ip to redis configurations in web api startup class.

public void ConfigureServices(IServiceCollection services)
{
    // Add framework services.
    services.AddMvc();
 
    services.AddDistributedRedisCache(options =>
    {
        options.Configuration = "172.21.0.2";
        options.InstanceName = "redisInstance";
    });
}

After this change, I am running build and up scripts again. (I forgot: before run build and up scripts we should run this script to stop docker containers docker-compose down -v –rmi local and also you can create a down.ps1 script and you can add this command to in down.ps1 file)

And, now I am testing web api project again and result;

img

img

There an elegant way to fix this error that I mentioned above. Final version of Startup.cs.

public void ConfigureServices(IServiceCollection services)
{
    // Add framework services.
    services.AddMvc();
 
    services.AddDistributedRedisCache(options =>
    {
        options.Configuration = Dns.GetHostAddressesAsync("dockerconfig_ali_redis_1").Result.FirstOrDefault().ToString();
        options.InstanceName = "redisInstance";
    });
}

dockerconfig_ali_redis_1 is the name of redis container. After this changing, web api project will resolve the dns of machine that is deployed on.

I finished the adding redis step. Next step; I will add the haproxy and finish the article.

Adding Haproxy to Web Farm

I will add haproxy to project to load balancing. To add haproxy to project, first I will add a file that named haproxy.cfg to configure the haproxy.

global
    maxconn 4096

defaults
    mode http
    timeout connect 5s
    timeout client 50s
    timeout server 50s

listen http-in
    bind *:8080

    server web-1 dockerconfig_ali_webapi_1:80
    server web-2 dockerconfig_ali_webapi_2:80
	server web-3 dockerconfig_ali_webapi_3:80

    stats enable
    stats uri /haproxy
    stats refresh 1s

And I am modifiying docker-compose.yml and up.ps1 like following.

docker-compose.yml

version: '2'

services:

    ali_redis:  
        image: ali/redis
        ports:
            - "6379:6379"

    ali_webapi:
        image: ali/webapi
        environment:
            - ASPNETCORE_ENVIRONMENT=Staging
            
    load_balancer:
        image: haproxy:1.7.1
        volumes:
            - "./haproxy.cfg:/usr/local/etc/haproxy/haproxy.cfg"
        ports:
            - "9911:8080"

up.ps1

docker rm $(docker ps -aq)
docker-compose up -d ali_redis
sleep 3
docker-compose up -d ali_webapi
sleep 2
docker-compose scale ali_webapi=3
sleep 2
docker-compose up -d load_balancer

And the result:

img

img

How can we know if it works?

I am modifiying the GetCacheData action that is in ValuesController.cs

[HttpGet("GetCacheData")]
public string GetCacheData()
{
    try
    {
        var time = Encoding.UTF8.GetString(_memoryCache.Get("serverTime"));
        ViewBag.data = time;
 
        return "Server time: " + time + " - Machine name: " + Environment.MachineName;
    }
    catch (Exception ex)
    {
        return ex.GetBaseException().Message;
    }
}

I added machine name to returning data to understand which web api application is calling.

img

img

After set cache data, I will try to get the same cache value for different machines.

img

img

img

As you can see, when I refresh the GetCacheData page, I can get the same value for different machines. And also it is possible to see haproxy is working with using haproxy web interface, too.

img

When you refresh the GetCacheData page, you can see that the haproxy is routing the requests to different machines. You can track which machine is running under Session rate> Cur tab.

You can download source code of example project: https://github.com/alirizaadiyahsi/WebFarmExample