In this article, we will build a basic real-time messaging application in a distributed architecture. We will use Abp Framework for infrastructure and tiered startup template, SignalR for real-time server-client communication and RabbitMQ as the distributed event bus.
When Web & API tiers are separated, it is impossible to directly send a server-to-client message from the HTTP API. This is also true for a microservice architected application. We suggest using the distributed event bus to deliver the message from API application to the web application, then to the client.
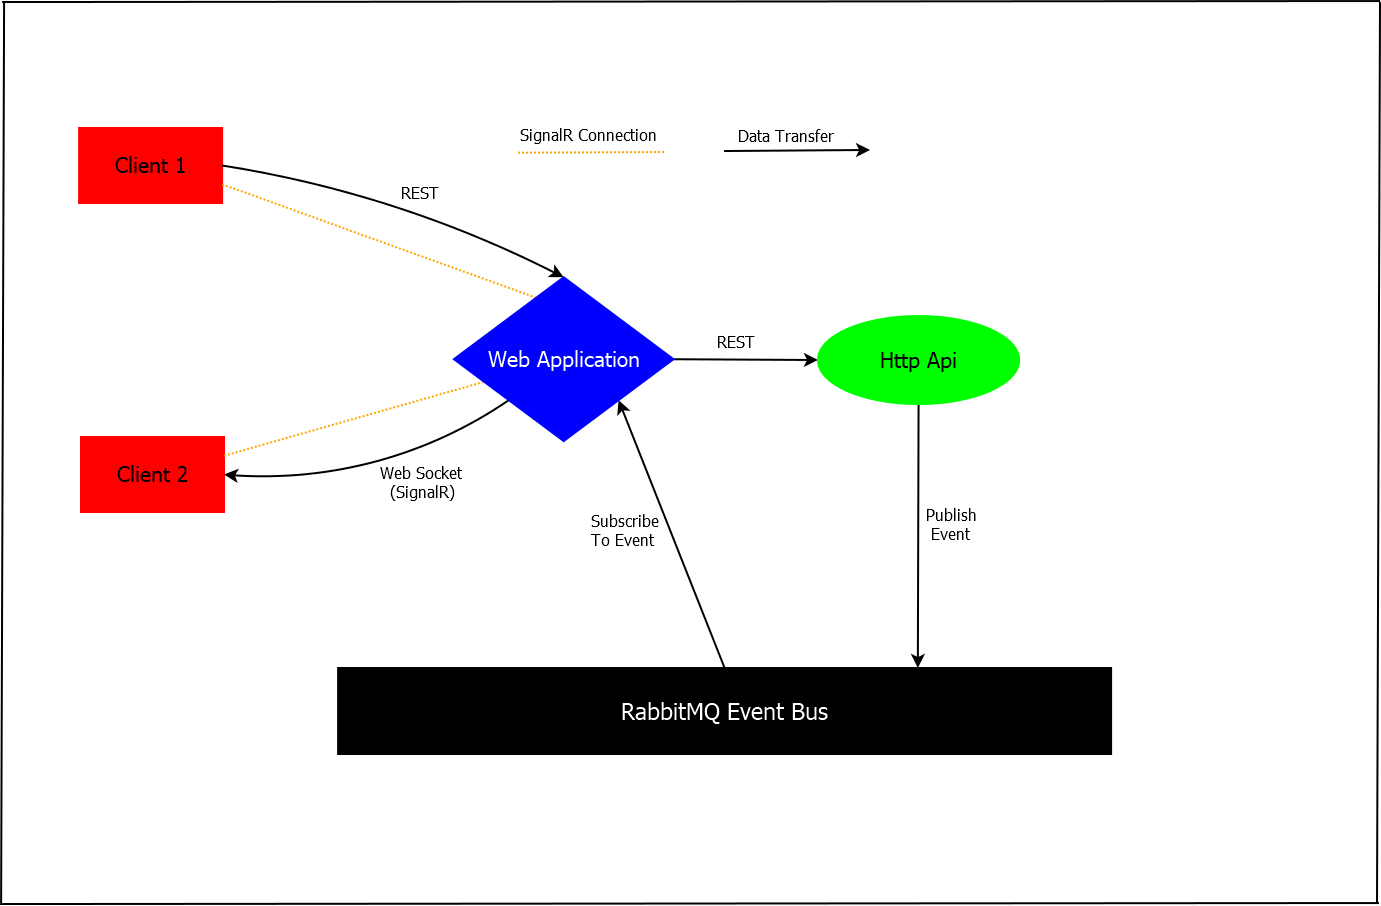
Above, you can see the data-flow that we will implement in this article. This diagram represents how data will flow in our application when Client 1 sends a message to Client 2. It is explained in 5 steps:
- Client 1 sends a message data to Web Application via a REST call.
- Web Application redirects the message data to Http Api.
- The message data is processed in Http Api and Http Api publishes an event that holds the data that will be sent to Client 2.
- Web application, that is subscribed to that event, receives it.
- Web Application sends the message to Client 2.
For this example flow, we could send a message from Client 1 to Client 2 directly on the SignalR Hub. However, what we are trying here to demonstrate is sending a real-time message from the Http Api to a specific user who is connected to the web application.
Implementation
Startup template and the initial run
Abp Framework offers startup templates to get into the business faster. We can download a new tiered startup template using Abp CLI:
abp new SignalRTieredDemo --tiered
After the download is finished, we run *.DbMigrator project to create the database and seed initial data (admin user, role, etc). Then we run *.IdentityServer, *.HttpApi.Host and *.Web to see our application working.
Creating Application Layer
We create an application service that publishes the message as an event.
In *.Application.Contracts project:
Input DTO for SendMessageAsync method:
Event transfer object (ETO) for communication on event bus:
In *.Application project:
Creating API Layer
We create an endpoint for sending the message that redirects the process to application layer:
In controllers folder of *.HttpApi project:
Adding SignalR
To add SignalR to our solution, we add Volo.Abp.AspNetCore.SignalR
nuget package to *.Web project.
And then add AbpAspNetCoreSignalRModule
dependency:
Also, we need to add @abp/signalr npm package to package.json in *.Web project, then run yarn and gulp commands.
Remember to add the latest package version.
You can find more information for Abp SignalR Integration on the related document.
Creating A Hub
We need a hub for SignalR connection. We can inherit it from AbpHup
base class.
In *.Web project:
While you could inherit from the standard Hub
class, AbpHub
has some common services pre-injected as base properties, which is useful on your development.
Adding & Configuring RabbitMQ
To add RabbitMQ to our solution, we add Volo.Abp.EventBus.RabbitMQ
nuget package to *.HttpApi.Host and *.Web projects.
Launch a command line, navigate to directory where *.HttpApi.Host.csproj file exist, and run the command below using Abp CLI:
Then do the same for *.Web project.
After we add the package, we configure RabbitMQ by adding configuration in appsettings.json files of those projects.
For *.HttpApi.Host project:
For *.Web project:
Handling New Message Event
Once we publish a new message event from Http Api
, we must handle it in Web Application
. Therefore we need an event handler in *.Web Project:
Creating Chat Page
We create the files below in Pages folder of *.Web Project.
Chat.cshtml:
Chat.cshtml.cs:
Chat.css:
Chat.js:
Then we can add this new page to menu on *MenuContributor.cs in Menus folder:
Running & Testing
We run *.IdentityServer, *.HttpApi.Host and *.Web in order. After *.Web project is ran, firstly log in with admin
username and 1q2w3E*
password.
After we login, go to /Identity/Users
page and create a new user. So that we can chat with them.
Then we open the application in another browser and login with the user we created above. Now we can go to the chat page and start messaging:
We can test with more users. All sent and incoming messages are displayed in the left box.
Source code
The source code of the final application can be found on the GitHub repository.
Edward 4 years ago
How about when the client app is Angular?
kelvinksau@gmail.com 4 years ago
As ABP also get kafka support, could we add the Kafka config session accordingly ?
yekalkan 4 years ago
Hi, You can see "Distributed Event Bus Kafka Integration" document to use Kafka instead of RabbitMQ. https://github.com/abpframework/abp/blob/dev/docs/en/Distributed-Event-Bus-Kafka-Integration.md